Showing posts with label cooking. Show all posts

Saturday, August 11, 2012

Cooking from the Garden

This time of year can be a little overwhelming for vegetable gardeners as the harvest rolls in.  There is only so much room in the refrigerator drawer, and I find myself scrambling to use the fresh stuff before it grows mold. Here are a few ways I'm managing. 

Zucchini Pizza Crust
Jackie in plot #38 in our community garden told me this recipe (thanks, Jackie!), and I tweaked it a bit with the baking powder.  Sneak some green veg into the always popular pizza!  The end result has a somewhat chewy texture similar to foccacia.

Ingredients:
2 t. baking powder
3 c. flour
3 c. grated zucchini
3 eggs, lightly beaten

zucchini pizza dough
Sift baking powder and flour together.   Combine eggs and zucchini.  Slowly add flour mixture to wet ingredients, stirring to combine until a soft dough is formed.  Add more flour if the dough seems too loose.


Ready for toppings
Spread dough onto a cookie sheet lined with parchment paper.  Bake until golden brown.   Remove from oven and add toppings, then bake until toppings reach desired doneness. Cold toppings like spreads and fresh tomatoes can also be added.


Swiss Chard Chips 
Both kale and swiss chard can be quickly dehydrated in the oven and made into crispy chips.   I’ve read recipes with longer cooking times at 200 degrees, but I see no reason to have my oven on for an hour in the summer if I can get away with baking for 10 minutes with the same results.   I’m harvesting lots of chard right now, and the kids need to eat something other than cereal and ice pops.  These greens both have a gently bitter taste and are loaded with calcium and other nutrients.  They're a good way to introduce kids to these flavors, since they'll try anything called a "chip."

Ingredients:
I bunch of fresh kale or swiss chard (at least a dozen leaves)
1 T. olive oil
1 t. salt or seasoning blend

Preheat oven to 350.  Wash and dry the swiss chard leaves.  Tear the leaves away from the rib, into pieces about the size of the palm of your hand.  Toss the leaves with olive oil until shiny.   Spread the leaves on a rimmed baking sheet.  Bake for 7 – 10 minutes, watching carefully to avoid burning.    (It may look like the chips are sticking to the cookie sheet – they’re not! They’ll come up easily once they’re crisped)  Chips will be a dark greenish-brown.  

Remove from cookie sheet and sprinkle with seasoning.  They can be stored in an airtight container, but the sooner they’re eaten, the crispier they’ll be.


disregard random child
Grandma Lucy’s Tomato Sandwich          
Grandma Lucy taught me how to make this simple but incomparable sandwich.  She’d often have it for breakfast or lunch  when we visited her in Ohio in the summertime. There is nothing like Ohio sweet corn and tomatoes at the height of summer!  Some things about this sandwich are negotiable.  For example, you could use Miracle Whip (ew!) in place of mayo – Grandma Lucy did.   You can use any spice blend you like, such as Old Bay, Tony Chachere’s or Goya Adobo (I like the lemon/pepper with the yellow cap), though Lawry’s Seasoned Salt is the original mix.   But you MUST use juicy ripe tomatoes at their peak and wheat toast, though if you want to use bread that doesn’t come out of a plastic bag, that’s certainly understandable.

Ingredients:
One ripe medium-sized tomato, sliced
Two slices of wheat sandwich bread
¼ t. Lawry’s Seasoned Salt
1 t. mayonnaise


Toast the bread to it’s desired darkness.  Spread one side of the toasted bread with mayonnaise.  Add two tiers of tomato slices on top of the mayonnaise, then sprinkle with seasoning.  Top with remaining slice of bread.

What are you making with your garden harvests?


Garden Pie (follow link to left for recipe)
More Summer Garden Recipes

Monday, June 11, 2012

Shrubbing Around

Rhubarb/Lemon Balm Shrub
Ever drink a shrub?   Shrubs are also known as “drinking vinegars.”  They’re made with fruit, vinegar and sugar and can be used as the basis for lots of summer treats like sodas and cocktails. I discovered shrubs when a friend gave me a generous helping of fresh rhubarb.   I’ve never grown it and have never cooked with it.  I didn't feel like baking so I passed up lots of recipes for rhubarb cakes, bars and muffins, but then I saw a tweet urging me to be “adventurous” and try a rhubarb shrub.  That got my attention.   

What I found out is that shrubs are a super alternative for someone like me, because I dislike drinking plain water, but don’t use artificial sweeteners.   Shrubs are all-natural and you can easily control the amount of sugar and customize them to your liking.  The possibilities for shrubs are infinite, and recipes vary widely.  There are many formulas and as just as many opinions about which is best.  There is even a blog devoted to shrubs! With music!  Check out www.bringmeashrub.blogspot.com.

The basic recipe for a shrub is :

1 cup of vinegar
1 cup of fruit
1 cup of sugar

chopped rhubarb
Smoosh and smash the fruit and any other flavorings in a non-reactive saucepan.  Add the vinegar, and bring to a simmer.  Remove from heat, leave to cool and allow to step unrefridgerated for 2-4 days.  After that, strain out the fruit and any other solids, and bring the mixture to a simmer on the stovetop once again.   Add the sugar and continue to simmer.   Once the sugar is dissolved and the shrub is allowed to reduce slightly, remove from heat.  It can then be stored in the fridge- glass Mason jars are ideal for storage.

So far I’ve made 2 shrubs: 

Rhubarb Lemon Balm Shrub
2 c. chopped rhubarb
¼ c. chopped lemon balm
2 c. apple cider vinegar
1 c. sugar  (I wanted to see what it would be like with half the recommended amount of sugar.  I found it plenty sweet.)

Strawberry Balsamic Lillet Shrub
1 c. crushed strawberries (This was the perfect thing to do with the sadder, not-so-perfect berries from my little patch.)
1/4 c. balsamic vinegar
1/2 c. apple cider vinegar
1/4 c. Lillet appertif - this is a super-juicy French concoction that I had on hand. It’s a blend of wines and orange-flavored liquors.
1 c. sugar


Here are some ways I’ll be using the syrups:
Pour directly or mix with maple syrup to pour on pancakes,  combine with vodka, gin, (shrubtinis?), wine or champagne,  pour over ice cream or sherbet
Combine with carbonated water or mineral water if you prefer things less fizzy, use to flavor a yogurt smoothie or stir into plain or vanilla yogurt, drizzle on hot oatmeal, put several tablespoons over crushed ice and make a snowcone, use in salad dressings, use in meat marinades.

What else can be done with shrubs?  I’d love to hear your ideas!


Sunday, December 18, 2011

Getting Creative With Pizzelles

Grandma Rose was the expert pizzelle maker in our family, and she and my mom got together every year to make them.  My mom, in turn, became a pizzelle fairy, distributing them to friends, teachers, physicians, mailmen and anyone else lucky enough to cross her path during the Christmas season.  So of course, when I got married, a pizzelle iron was among the gifts.  

Here’s what my pizzelle iron looks like today. 

Mind you, I know people who would be horrified by this, but Grandma Rose would have said that the golden-brown patina caused by decades of burnt grease is useful for "seasoning" the iron and enhances the flavor.

Pizzelle recipes are fun to tinker with.  The basic recipe is:

1 cup (two sticks) margarine
6 eggs
1.5 cups sugar
2 t. vanilla
4 t. baking powder
3.5 c. flour
1) Melt and cool one cup of margarine (be sure to use margarine – it doesn’t burn as quickly, which is important in the iron)

2) In a large bowl, combine the margarine with 1.5 cups of sugar and 2 t. vanilla. Add the eggs one at at time.
3) In a separate bowl, combine 4 t. baking powder and 3.5 c. flour., and with a hand mixer, add to the wet ingredients, about a cup at at time and beat until smooth. 

4) Put 2 t. on each side of a hot iron and bake for about 30 seconds until golden.  (All irons are different!  Your mileage may vary).

The fun usually starts by substituting other flavored extracts for the vanilla.  Anise is popular, but I’ve also used orange and lemon extracts. 

     You can also add an additional  1/2 c. of cocoa, 1/2 c. of sugar and 1/2 t. baking powder to the dry ingredients to make chocolate pizzelles, then put a scoop of peppermint ice cream in between.   Move over Klondike.

     Pizzelles right from the iron are still pliable and can be rolled into tubes (for cannolis) and cones.   For my wedding, we filled pizzelle cones with Jordan almonds and gave them out as favors.  At Italian weddings five almonds symbolize health, wealth, happiness, fertility, and longevity.


     I tried something new this year with colored sprinkles.  These must be handled with caution, because if they’re applied too densely, they’ll melt into a big wad and muck up your iron.  I had better results sprinkling them onto pizzelles that were about 10 seconds from being fully baked, then reapplying the iron for the remaining 10 seconds or so.    The sprinkles stuck nicely to the cookie. 

    Chocolate chips can be melted in the microwave and spread on the back of a spoon, applied lightly to the relief pattern of a finished cookie, then, quickly before the chocolate sets, sprinkle with nonpareils. 


If you’re not feeling fancy, they’re wonderful just sprinkled with powdered sugar.   
Have you started your holiday baking yet?  What kind of cookies are you making?


Tuesday, November 1, 2011

Cooking Like Paula Deen

Banoffee Pie
Come to think of it, I haven’t seen her cooking show too many times.  I must do a lot of Paula-Deen-style cooking, though, because whenever I’m looking for a recipe via Google, hers often pop up.  A few weeks ago, I wanted a recipe for Banoffee Pie, a banana pie made with whipped cream and carmelized milk.  Hers came up.  Then I looked for Shrimp Etouffee – and hers came up, too.  Neither of these recipes called for butter, the ingredient that has given her such notoriety.  (And enough about the butter -- have you read Ina Garten’s recipes lately?  Talk about heavy cream!)

Paula Deen
I loved Paula’s gracious and humorous response to the recent criticism from Anthony Bourdain that she is the "most dangerous person in America" and I LOVE the fact that Maxim readers have voted her TV’s hottest female chef (but shame on them for using a photo of a stick of better, rather than one of Paula, to illustrate their article!)   

What I love most about Paula Deen, though, is her story, which she told at a recent live event.   Most would never guess that she had to overcome severe agoraphobia  (“I ended up having to cancel my children’s activities because I couldn’t leave the house.”) and hypochondria (“It got to where I couldn’t even watch Dr. Welby MD.  I started thinkin I had everything they were talkin about.”)  Paula’s parents died when she was a young mother, and she was tasked with raising her younger siblings as well as her own brood, with a husband “who really liked lots of cold beer.”   She credits the Serenity Prayer with helping her stay grounded and on track.   Back then, she was afraid that her friends would see her mopping floors at the grocery store. I wonder what those same friends think of her now. 

Shrimp Etouffee

Growing up in Florida and living in Louisiana for a few years don’t quite make me a Southerner, but I have eaten and appreciate a good gumbo -- so I was happy to see that there is a recipe for it in her new cookbook, Paula Deen’s Southern Cooking Bible, along with lots of other dishes that I think will feel very at home on my table.


I don’t even think Paula expects me to feed my family from this book every day, but when I have time for something more than a quick weeknight dinner, when I need a dish with special comforting skills, or something to remind me of warm gulf coast breezes, I’ll be reaching for this book -- co-written with Melissa Clark.

So what do you think of Paula? 

Monday, October 24, 2011

10 Halloween Food Ideas

Rather than a bag of that disgusting candy corn, bring one of these goodies to the party this weekend.  Some of these things we made ourselves, and some were discovered at gatherings when I was lucky enough to have a camera handy. 

1) Butternut Squash and Black Pasta:  Sautee garlic, olive oil, basil and steamed butternut squash, combine with cooked black "Squid Ink" noodles. Purty. 


2) Cheese Mummy - This idea came from our friends the Olsens.  It's made by forming a "cheese ball" into a humanoid shape, then covering it with strips of mozzarella and roasted red pepper.  Disappears fast.


3) Eyeball Appetizers-  Jaundiced deviled egg eyes look even more pathetic when surrounded with alfalfa sprout "guts".   Irises are made from sliced pimento olives.  Another colorful "eyeball" can be made with sliced carrot, a blob of cream cheese and a black olive. 

4) Fondue Cauldron - Cut vegetables into the shape of body parts and dip into cheesey witch's gruel.

5) Frankenmeat! - Why have a meat loaf when you can shape it into FRANKENMEAT? Make it even more gory with tomato sauce blood.  Cut a toothy grimace from zucchini squash slices.

6) Wormy Caramel Apples - Use twigs (washed well) instead of popsicle sticks, and cover caramel apples with gummy worms and candied sunflower seeds.  Garnish with colored leaves.

7) Graveyard Cake - a "Dirt Cake" can become a graveyard by turning rectangular cookies or Milanos into tombstones.  To ensure horrified, incredulous looks from the other moms, put the names of your guests on each tombstone.  Add worms and candy body parts.

8) Our friends Pat and Jeff made these kitty cakes using licorice shoestrings and dots on pumpkin muffins.


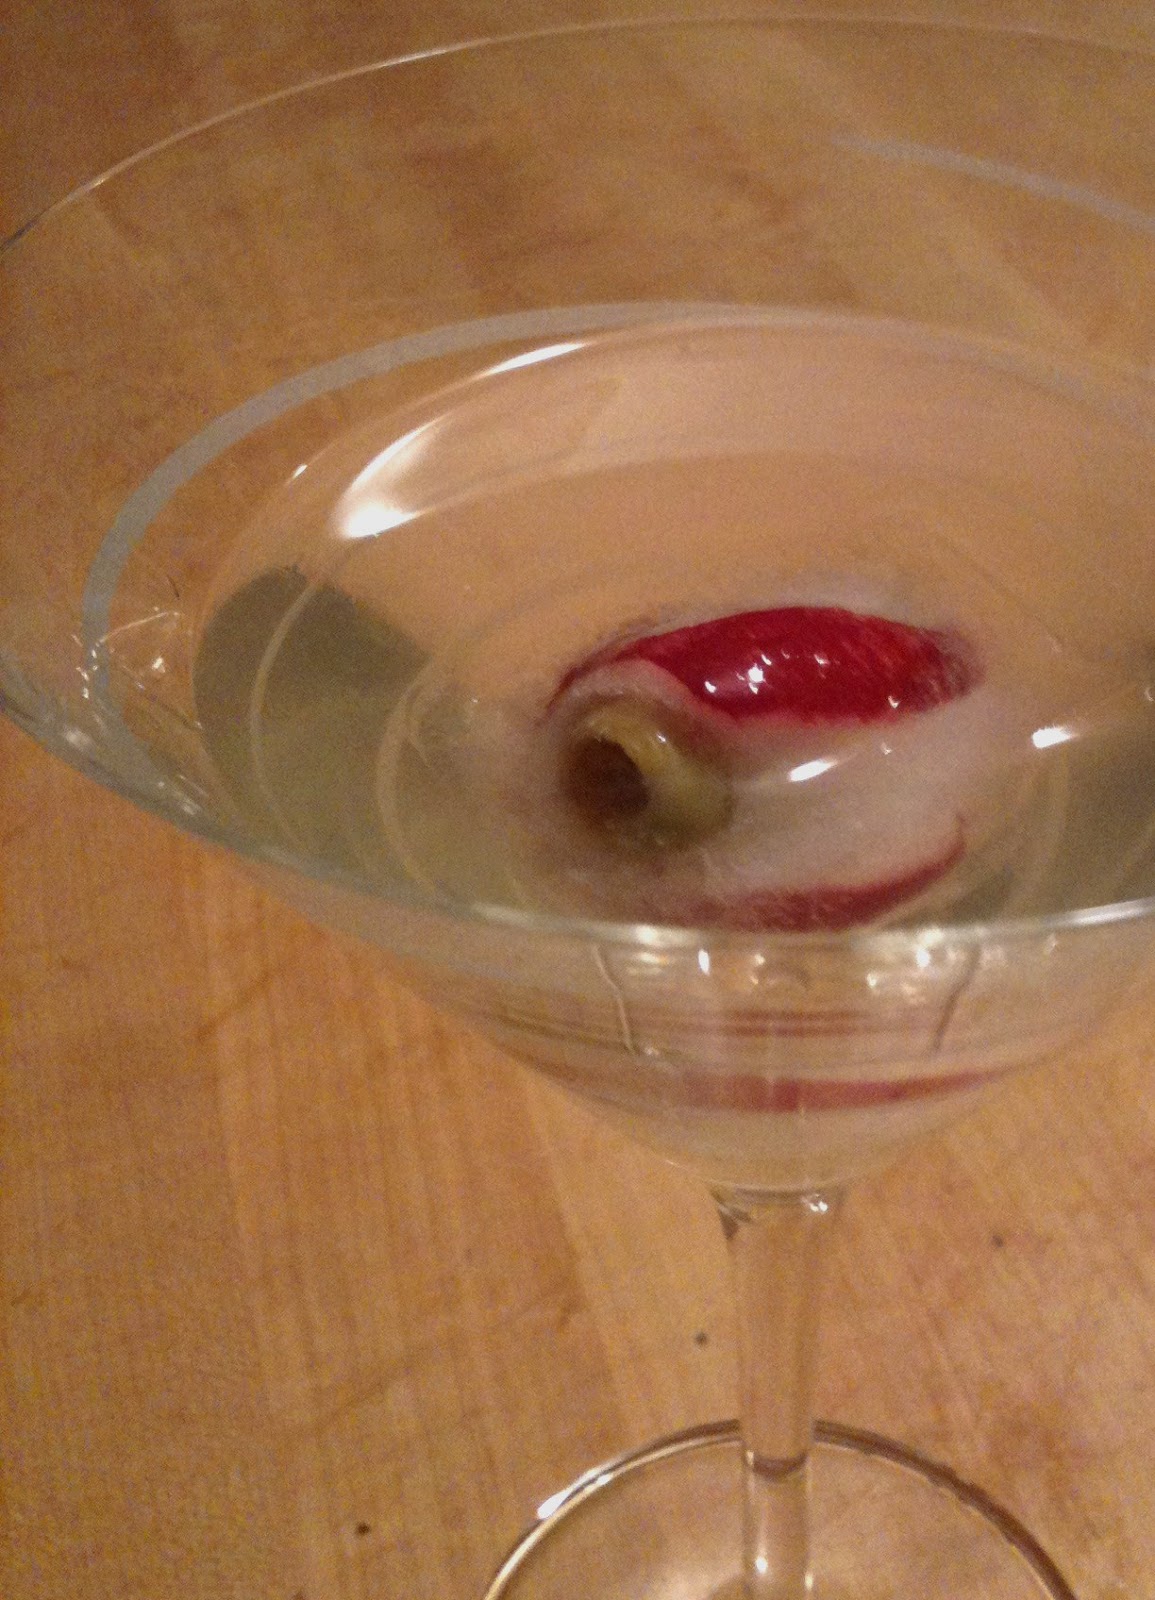
9) Eyeball Cocktail - Peel a radish in a way that leaves several red "veins," gouge out a space to stuff with an olive. Freeze in an ice cube so that it floats. 


10) Salted Pumpkin Caramels (via Food 52)- flavor caramels with pumpkin and pumpkin pie spice.  Sprinkle with pumpkin seeds and kosher salt. 


Happy Halloween!  Hope you're hungry!

Saturday, October 15, 2011

Growing, Blooming, Picking, Baking


It's Garden Blogger's Bloom Day, hosted by Carol at May Dreams Gardens.  Lots going on here in zone 6A this time of year -- so much that it's hard to give anything the attention it deserves.  There are still vegetables to be harvested, and flowers to scope out, apples to pick and ... we're finally in the mood to bake!  Forgive me, but I'm combining 4 posts in one today.

First the Growing:

Peas - "Sugar Ann" is a variety of snap pea that has a very short time to harvest - only 50 days.  These were planted around mid-August.  Although they're not supposed to need trellising, I think it could have helped.  It was nice to have some fall peas, since I neglected to plant them in the spring.


It took a while to get going, but the radicchio was finally harvested. I cut it in half, brushed it with bacon grease, grilled it and topped it with balsamic vinegar.  So good!

The Butternut Squash that grew in the backyard didn't grow to a very impressive size, but it was delicious,
filled with beets and topped with brown sugar and butter, then roasted.


Most of the lettuce seeds I sowed in August were washed away by hurricane Irene- I got one nice harvest though.


Blooming
Front door - I've got Autumn Joy and red geraniums in pots,  some volunteer nasturtium growing between the steps.  The container has Cuban oregano, creeping thyme, oxalis, lavendar, and I've forgotten the name of the plant with the purple veined leaves (please remind me if you know!)


Pentas and petunias still going strong in an old BBQ grill that I converted to a planter.  Zinnas still standing strong.

Here are the 3rd generation French Marigolds -- I'll be collecting these seeds again for sure.  Nothing looks better this time of year.


Apple Picking
We've had lots of stunningly gorgeous sunny fall days, aso we took advantage of it and made two apple picking trips this year, to our local spots,  Dr. Davies Farm with our friends Kelly, Aiden and Robby, and to Orchards of Concklin with our cousins. 


Baking
The kids peeled the apples, and my sister-in-law Janine put together an awesome apple crisp.  Thanks to Cindy F. from our Working Moms group for the recipe.

Apple Crisp
6 cups peeled sliced cooking apples
1 cup rolled oats
1 cup brown sugar
1/2 cup flour
1 tsp cinnamon
1/4 tsp nutmeg
1/2 cup butter

Put apples in square baking dish. Combine the next 5 ingredients in a bowl.
Cut in the butter until the mixture looks like coarse crumbs. Sprinkle over
the apples. Bake at 375 F for 30 minutes or until apples are your favorite
consistency. Serve warm with caramel sauce and vanilla bean ice cream.


Hey, I saved a whole bunch of "Minnesota Midget" heirloom cantaloupe seeds - they were lots of fun to grow.  If you'd like some, just send your address to me at nyackbackyard@gmail.com.  While supplies last, of course.